Custom Domains
This guide explains how to configure a custom domain (e.g., apps.yourdomain.com) for your App Store for Intune deployment on Azure App Service.
Overview
Section titled “Overview”By default, your portal is accessible via an Azure-assigned URL like:
https://apprequestportal-xxxx.azurewebsites.netYou can configure a custom domain to provide a more professional, branded experience:
https://apps.yourdomain.comPrerequisites
Section titled “Prerequisites”- Azure App Service running your portal (Basic tier or higher for custom domains with SSL)
- Access to your domain’s DNS management
- Admin access to your Entra ID App Registration
Configuration order
Section titled “Configuration order”DNS records have to be in place before Azure validates the domain (Azure reads the TXT and CNAME you create at registration time). The portal’s in-product Settings tab guides admins through these steps in this order, and so does this reference doc:
- Configure DNS records at your provider
- Add the custom domain to Azure (one-click button or manual)
- Update Entra ID redirect URIs
- Update the portal’s Portal URL setting
Step 1: Configure DNS records
Section titled “Step 1: Configure DNS records”For subdomains (recommended)
Section titled “For subdomains (recommended)”If using a subdomain like apps.yourdomain.com:
| Type | Name | Value | TTL |
|---|---|---|---|
| CNAME | apps | your-app.azurewebsites.net | 3600 |
| TXT | asuid.apps | <Custom Domain Verification ID> | 3600 |
To get the Custom Domain Verification ID:
- Go to Azure Portal → App Services → your App Service. The App Service name is the
appNamevalue you captured from the deployment outputs. - Go to Settings → Custom domains.
- Select + Add custom domain. The Custom Domain Verification ID is shown in the dialog. Copy it for your DNS TXT record above. You’ll come back here to actually save in Step 2.
For apex/root domains
Section titled “For apex/root domains”If using your root domain (e.g., yourdomain.com):
| Type | Name | Value | TTL |
|---|---|---|---|
| A | @ | <App Service IP Address> | 3600 |
| TXT | asuid | <Custom Domain Verification ID> | 3600 |
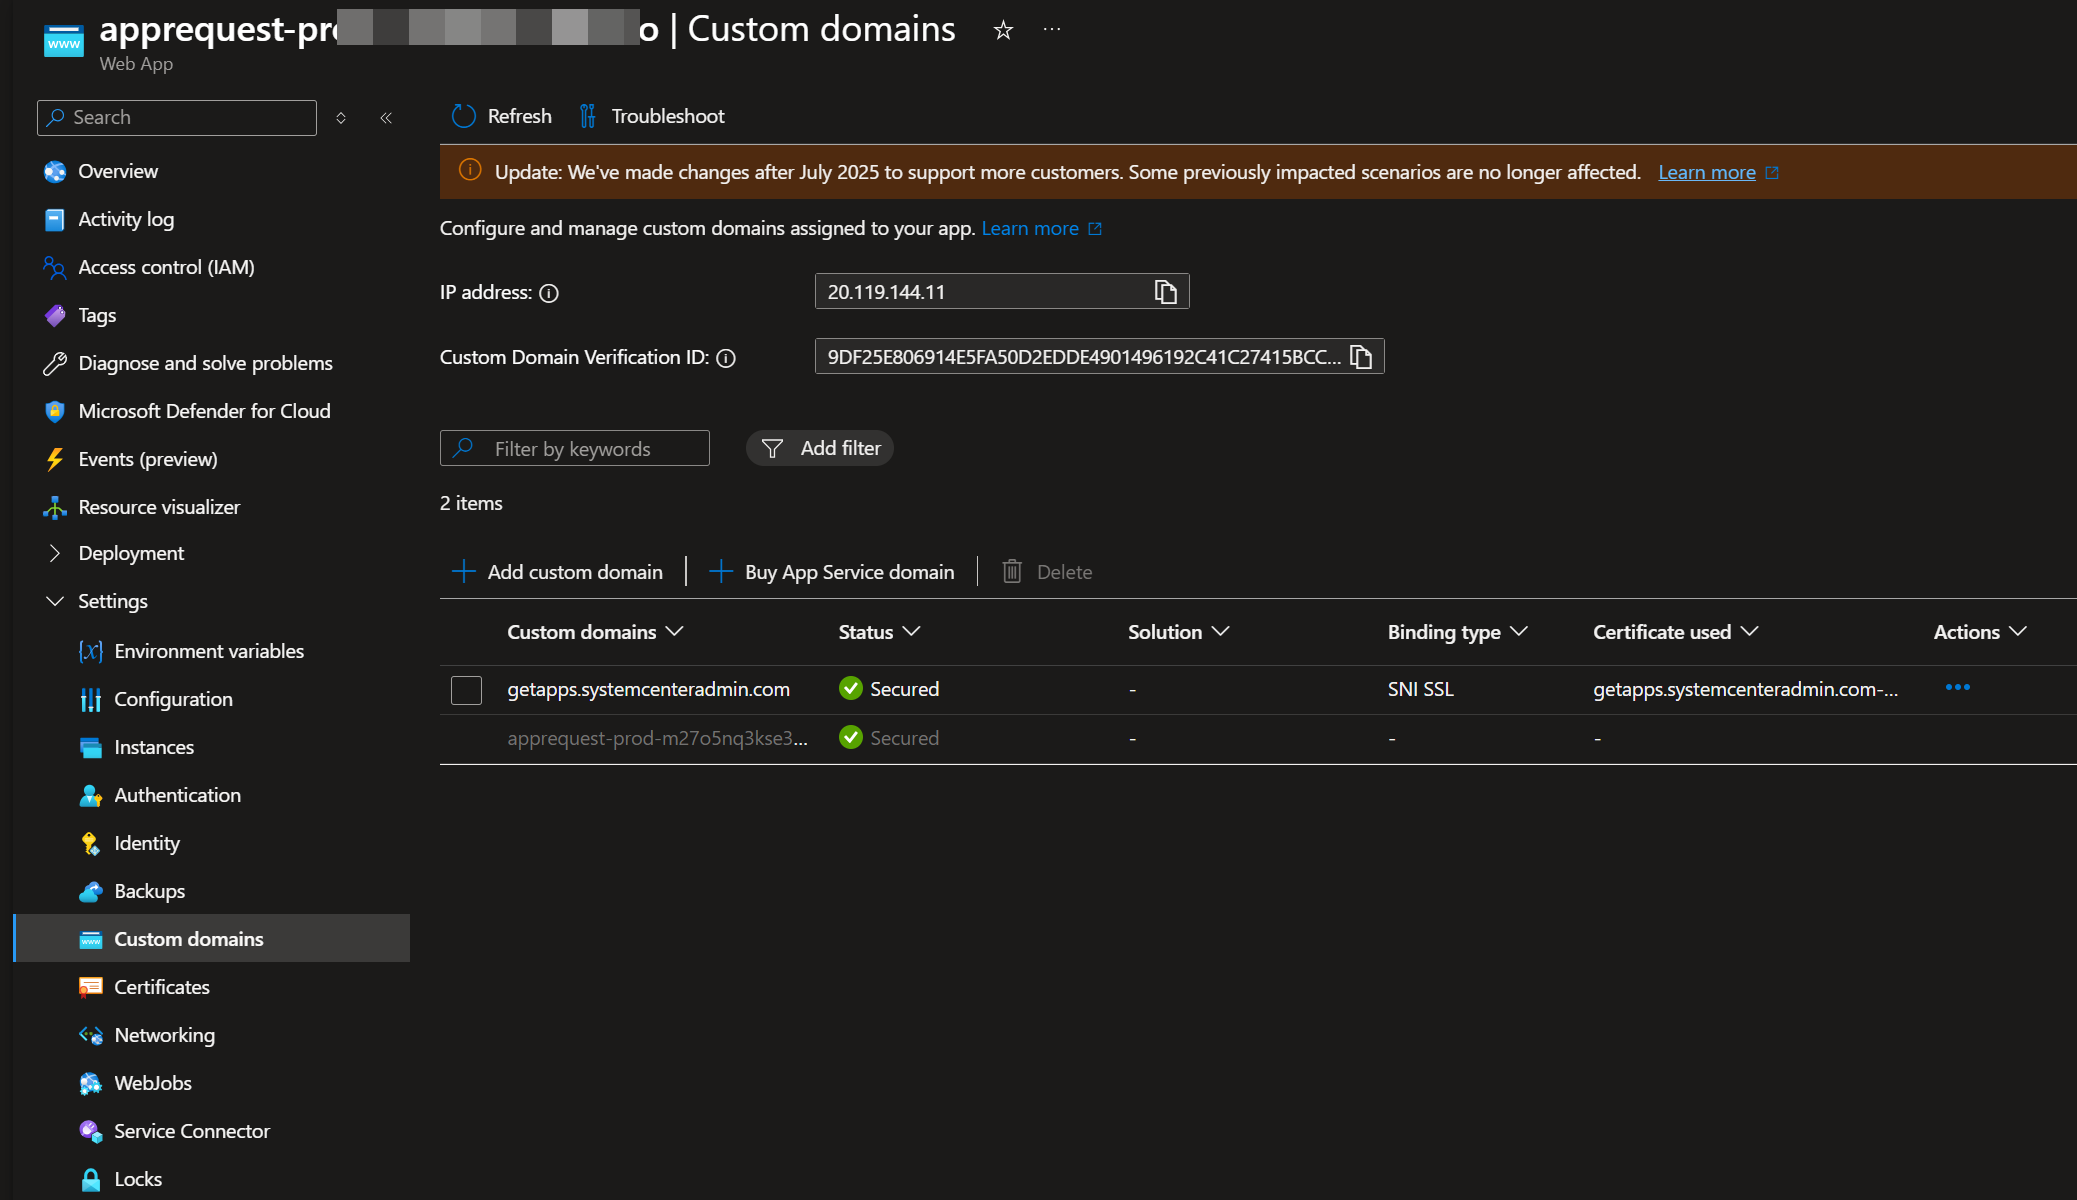
Note: Get the App Service IP address from Settings → Custom domains → IP address in Azure Portal.
DNS propagation
Section titled “DNS propagation”DNS changes can take anywhere from a few minutes to 48 hours to propagate globally. You can verify propagation using:
- dnschecker.org
nslookup apps.yourdomain.comdig apps.yourdomain.com
Step 2: Add custom domain + SSL certificate to Azure
Section titled “Step 2: Add custom domain + SSL certificate to Azure”Option A: One-click deployment (recommended)
Section titled “Option A: One-click deployment (recommended)”The portal ships an ARM template that adds the custom domain hostname binding and provisions a free Azure-managed SSL certificate in a single deployment. Launch it directly:
The same template is also reachable from inside the portal once you’re signed in: Admin → Settings → Custom Domain Setup → Configure Custom Domain in Azure.
DNS records (Step 1) must already be propagated, otherwise Azure’s domain validation will fail at deployment time.
Option B: Manual configuration
Section titled “Option B: Manual configuration”Microsoft’s official tutorial is the canonical reference: Tutorial: Map custom domain to App Service (Microsoft Learn).
Quick summary:
-
Go to Azure Portal → App Services → your App Service. The App Service name is the
appNamevalue you captured from the deployment outputs. -
Go to Settings → Custom domains.
-
Select + Add custom domain.
-
In the Add custom domain dialog, set:
- Domain provider: All other domain services (use App Service Domain only if you purchased the domain through Azure itself).
- TLS/SSL certificate: App Service Managed Certificate for the free Azure-managed cert. Pick Add certificate later if you’ll bring your own, see Other certificate options below.
- TLS/SSL type: SNI SSL.
- Hostname record type: CNAME for subdomains (recommended), A for apex/root domains.
- Domain: enter your custom domain (e.g.,
apps.yourdomain.com).
Once the domain is entered, the Domain validation section shows the DNS records Azure expects and their current resolution status, useful for confirming your Step 1 DNS records are propagated before you click Validate.
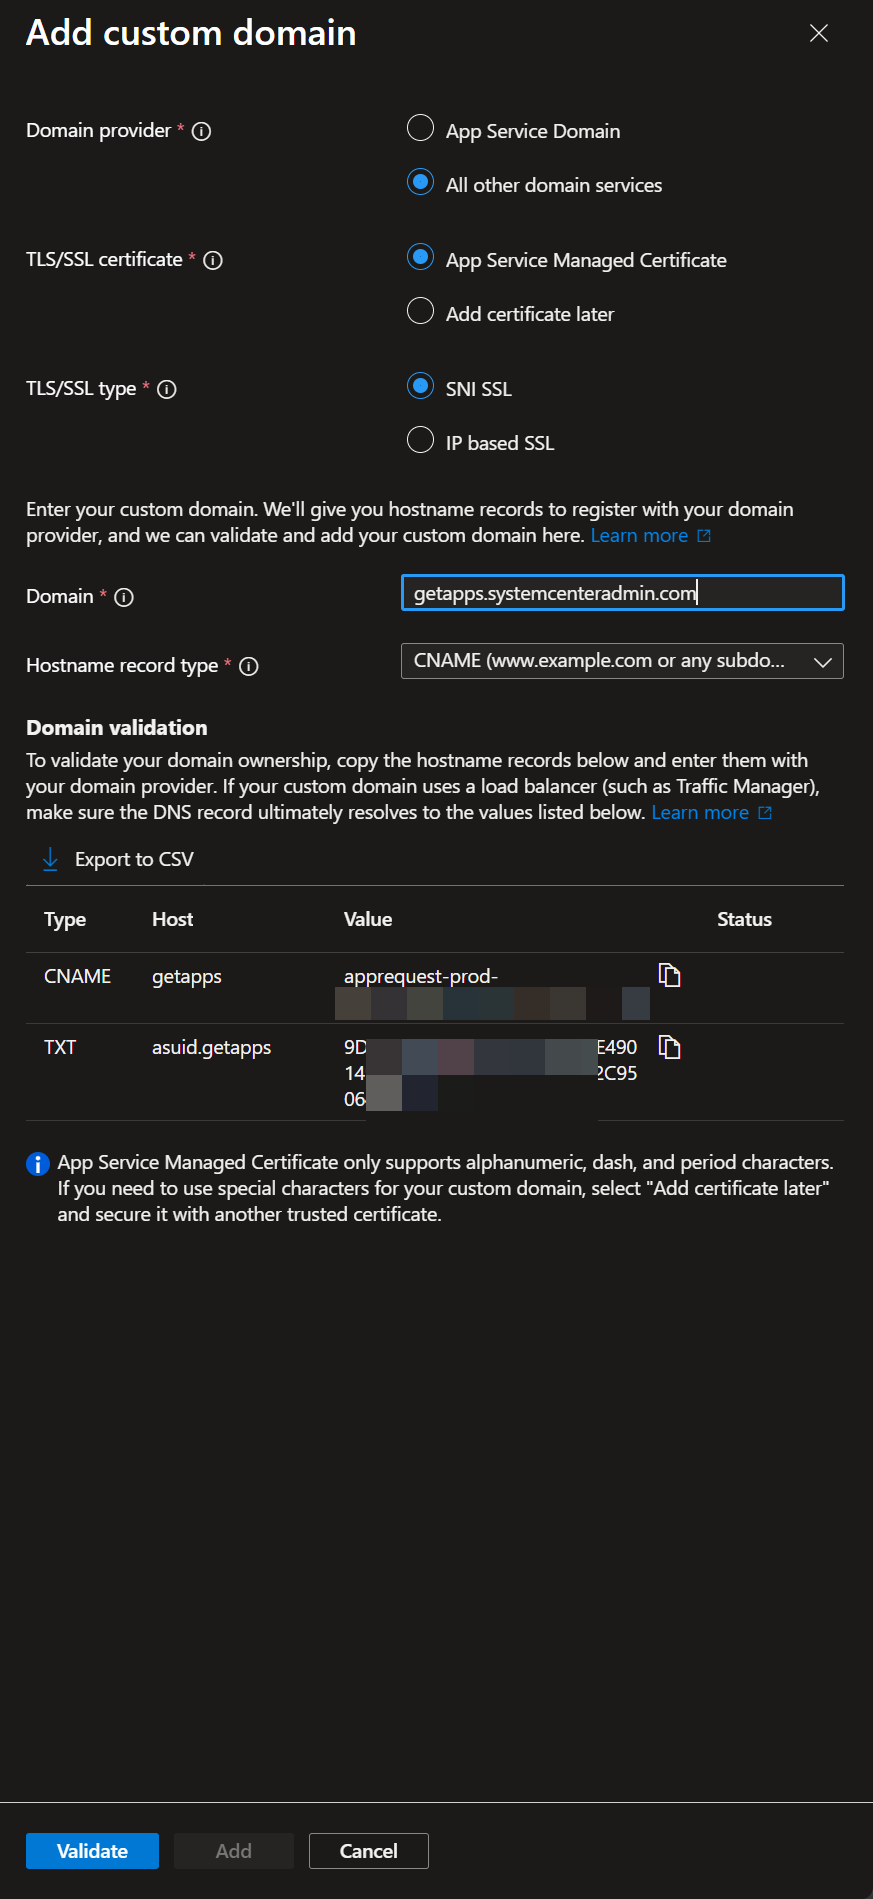
-
Select Validate. Each row in the Domain validation table flips to a green check once DNS is resolving correctly. If validation fails, your Step 1 DNS records haven’t propagated yet, wait and retry.

-
Select Add. Azure shows a notification confirming the custom domain was added, the App Service Managed Certificate was created, and the SSL binding was configured, all in one operation.
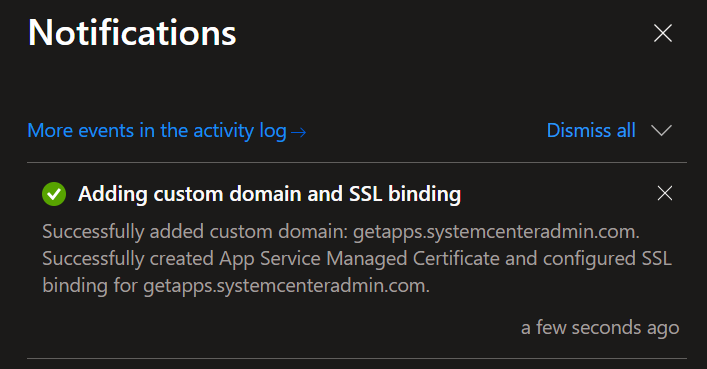
Allow a few minutes for the certificate to issue. The Custom domains list initially shows the new domain with no binding, then automatically updates to Secured with SNI SSL once provisioning finishes. No further action is needed in the Managed Certificate path.
If you selected Add certificate later in Step 4, finish with these extra steps to add and bind your own cert:
- Go to Settings → Certificates → + Add certificate.
- Select your certificate source (Key Vault import, upload, or Managed Certificate) and complete the dialog.
- Return to Settings → Custom domains → select your domain → Add binding → choose your certificate with SNI SSL.
Other certificate options (manual only)
Section titled “Other certificate options (manual only)”The one-click template uses an Azure-managed certificate, which has these limitations:
- Available for App Service Basic tier and above only
- No wildcard domains
- No apex/root domains (use Azure Front Door or a third-party cert)
If your scenario requires a different certificate path, replace step 7 above with one of these:
Azure Key Vault certificate:
- Upload or generate a certificate in Azure Key Vault
- In App Service → Settings → Certificates → + Add certificate
- Select Import from Key Vault
- Choose your Key Vault and certificate
- Bind to your custom domain
Bring your own certificate:
- Obtain a certificate from a Certificate Authority (CA)
- Export as PFX/PEM with private key
- In App Service → Settings → Certificates → + Add certificate
- Select Upload certificate
- Upload your PFX/PEM file
- Bind to your custom domain
Step 3: Update Microsoft Entra ID redirect URIs (App Store app registration)
Section titled “Step 3: Update Microsoft Entra ID redirect URIs (App Store app registration)”Redirect URIs are added to the App Store app registration’s Single-page application platform.
-
Go to Microsoft Entra admin center → App registrations
-
Select your App Store app registration (commonly named App Store for Intune or similar). If you have multiple app registrations and need to confirm which one the portal uses, get the client ID from Azure Portal → App Service → your App Store App Service → Settings → Environment variables (or Configuration in older portal versions) → AzureAd__ClientId, then match it to the Application (client) ID column on the App registrations list.
-
Go to Authentication → Platform configurations → Single-page application
-
Add the following redirect URIs:
https://apps.yourdomain.comhttps://apps.yourdomain.com/auth/callback -
Important: Keep the existing Azure URLs during transition so any open tabs and bookmarks keep working:
https://your-app.azurewebsites.nethttps://your-app.azurewebsites.net/auth/callback -
Select Save
Step 4: Update application configuration
Section titled “Step 4: Update application configuration”Update Portal URL setting
Section titled “Update Portal URL setting”-
Sign in to your portal as an admin
-
Go to Admin → Settings
-
On the Communications tab, update the Portal URL to your custom domain:
https://apps.yourdomain.com -
Select Save Settings
This controls the base URL used in email notifications and Teams bot notification links.
Update frontend configuration (if needed)
Section titled “Update frontend configuration (if needed)”If you’re using environment variables for the API URL, update REACT_APP_API_URL:
REACT_APP_API_URL=https://apps.yourdomain.com/apiStep 5: Force HTTPS (recommended)
Section titled “Step 5: Force HTTPS (recommended)”Ensure all traffic uses HTTPS:
- In Azure Portal → App Service → Settings → Configuration
- Go to General settings
- Set HTTPS Only to On
- Select Save
Step 6: Update Teams bot configuration (if enabled)
Section titled “Step 6: Update Teams bot configuration (if enabled)”If you have the Teams Bot enabled for proactive notifications, two things need updating:
Update Azure Bot messaging endpoint
Section titled “Update Azure Bot messaging endpoint”- Go to Azure Portal → Azure Bot resource → Configuration
- Change Messaging endpoint from:
to:https://your-app.azurewebsites.net/api/messageshttps://apps.yourdomain.com/api/messages
- Select Apply
Update Teams app manifest
Section titled “Update Teams app manifest”- Edit
manifest.jsonand add your custom domain tovalidDomains:"validDomains": ["apps.yourdomain.com","your-app.azurewebsites.net"] - Optionally update the
developerURLs (websiteUrl,privacyUrl,termsOfUseUrl) to use the custom domain - Re-zip the manifest files (
manifest.json,color.png,outline.png) - In Teams Admin Center → Teams apps → Manage apps, find the existing App Store for Intune bot, select it, and upload the updated package
Verification checklist
Section titled “Verification checklist”After configuration, verify:
- DNS resolves correctly (
nslookup apps.yourdomain.com) - HTTPS works without certificate warnings
- Portal loads at custom domain
- Sign-in/authentication works
- All navigation links use the custom domain
- Email notifications contain correct URLs
- Teams bot notifications still arrive (if enabled)
Troubleshooting
Section titled “Troubleshooting””Domain verification failed”
Section titled “”Domain verification failed””- Verify TXT record is correctly configured
- Wait for DNS propagation (up to 48 hours)
- Ensure the verification ID matches exactly
”Certificate error” or “Not secure”
Section titled “”Certificate error” or “Not secure””- Verify SSL certificate is bound to the custom domain
- Check certificate hasn’t expired
- Ensure certificate covers your domain (exact match or wildcard)
“Authentication failed” after domain change
Section titled ““Authentication failed” after domain change”- Verify redirect URIs are updated in Microsoft Entra ID
- Clear browser cookies and cache
- Check both old and new URLs are in redirect URIs during transition
”Mixed content” warnings
Section titled “”Mixed content” warnings”- Ensure all API calls use HTTPS
- Update any hardcoded HTTP URLs in configuration
Multiple environments
Section titled “Multiple environments”If you have multiple environments (dev, staging, production), configure separate custom domains:
| Environment | Custom Domain |
|---|---|
| Production | apps.yourdomain.com |
| Staging | apps-staging.yourdomain.com |
| Development | apps-dev.yourdomain.com |
Each requires its own:
- DNS records
- SSL certificate
- Microsoft Entra ID redirect URIs
- Portal URL setting